One bite of this rich dessert won’t make you wealthy, but it will make you smile. Buttery shortbread crust, a soft caramel center, topped with dark chocolate, and a sprinkle of sea salt make this bar worth a million. I would pay top dollar at a bakery for this delicacy.
Do you like Twix candy bars? This decadent little bar is similar, but even better than the store bought treat. It’s worth the effort to make these indulgent goodies. The trickiest part is the caramel. If you cook the caramel for too long it will be tough. It’s also quite easy to burn caramel. Just follow the directions for the caramel, and you’ll do fine.
Let me encourage you in your cooking and baking endeavors. Each winter I teach a cooking class to kids ages twelve and up. My students this year, most of whom had never cooked, made this recipe. They did a phenomenal job. There was no burned caramel. The kids all cooked it beautifully. If they can do it, and I can do it, you can do it too.
Millionaire’s shortbread is a special treat that lives up to its name. Make it for your family, your friends, your neighbors, or anyone who could use some happiness. Chocolate and caramel are always a winning combination.
Happy Eating!
Delight yourself in the Lord,
and he will give you the desires of your heart.
Psalm 37:4
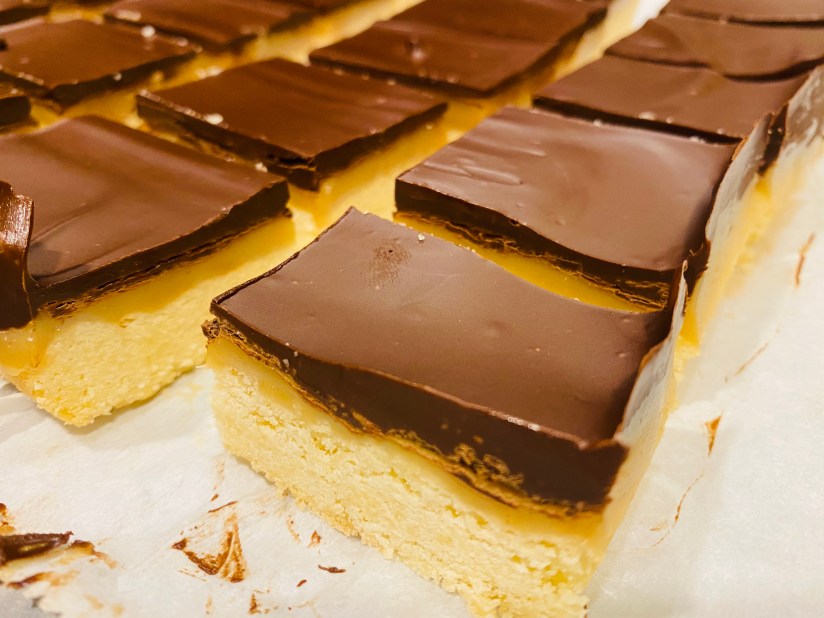
Millionaire’s Shortbread
Shortbread Crust
¾ cup butter (softened)
⅓ cup sugar
1 ⅓ cup flour
Caramel
½ cup butter
½ cup brown sugar
½ cup sweetened condensed milk
2 tablespoons regular pancake syrup
Chocolate
1 ½ cups dark chocolate chips
1 tablespoon butter
Directions:
1. Preheat oven to 350°
2. Line an 8 x 8 baking dish with foil or parchment and leave enough over the edges to create a sling. This will make it easy to take it out of the pan and cut into bars.
3. Make the shortbread crust:
Mix the butter, sugar, and flour with a spoon until small crumbs form. Press evenly into the bottom of your pan.
Bake for 20 minutes until lightly golden brown.
Cool completely before adding caramel.
4. Make the caramel:
In a medium saucepan place butter, brown sugar, sweetened condensed milk, and syrup. Heat everything on low heat until the butter melts. Then turn up the heat to medium/medium high & bring it to a boil. Stir continually. (Be careful because caramel can burn easily) Once it’s at a boil, turn down to a simmer and stir continually until caramel turns an amber color & is slightly thickened. Turn off the heat & immediately pour hot caramel over the cooled crust. Cool before adding the chocolate.
5. Melt the chocolate:
Combine the chocolate and butter in an oven safe glass bowl. Melt in the microwave for 90 seconds total. Stop every 30 second and stir the chocolate. Pour the melted chocolate over the caramel layer. Let it set up completely before cutting.
Optional: top with sea salt.
Notes:
*Make the crust and cool completely before you make the caramel. If not, the crust will tear when you add the caramel.
*If the caramel gets little brown bits, it’s OK, it will still taste good.
*Place the shortbread in the refrigerator between layers to speed up cooling.

You can read this article at the link below, and get all of my recipes on Mustard Seed Sentinel. Go to More and scroll down to Meghan’s Corner.
https://www.mustardseedsentinel.com/post/meghan-s-corner-millionaire-s-shortbread