Food

Roasted Lemon Rosemary Cod and Potatoes

dsc00967

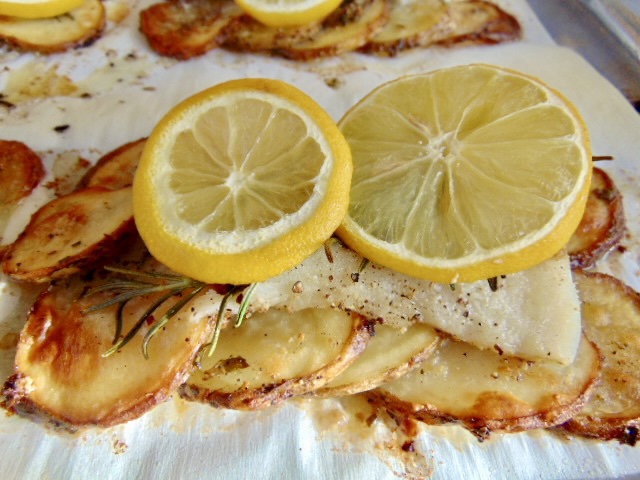
This recipe is a great way to add nutrition packed fish to your diet without being boring. The potatoes are perfectly crisp and brown, almost like a chip. The cod is tender, and flavorful with lemon and rosemary. It’s a winning combination. 

A variety of herbs will work for this fish. I used the herbs I had on hand from my garden, rosemary and garlic chives. Tarragon or thyme would be tasty. Use what you’ve got, or what you prefer for herbs. Like any recipe, tweak it to your liking.

I love simple dishes that cook in one pan. This meal delivers with wonderful texture and flavor all while giving much needed Omega-3 into your diet. You’ll get a tasty, appetizing dinner, that’s easy to make and satisfying to eat. Enjoy this lovely fish supper!

Happy Eating!

Many are the afflictions of the righteous, but the LORD delivers him from them all. Psalm 34:19


dsc00966

Roasted Lemon Rosemary Cod and Potatoes

Yield: 4 servings

Ingredients

4 cod fillets (6 to 8oz. each)

1 to 1 1/2 lbs. russett potatoes, skin-on, thinly sliced into 1/4 inch rounds

7 tablespoons total salted butter, (3 T. melted butter for potatoes, 4 T. cubed for fish)

2 garlic cloves minced

4 sprigs of rosemary

1 T. fresh chopped rosemary

1 tsp. fresh chopped garlic chives

salt and fresh ground black pepper

1 lemon thinly sliced

Instructions

  1. Preheat oven to 425°. Line a rimmed baking sheet with parchment.
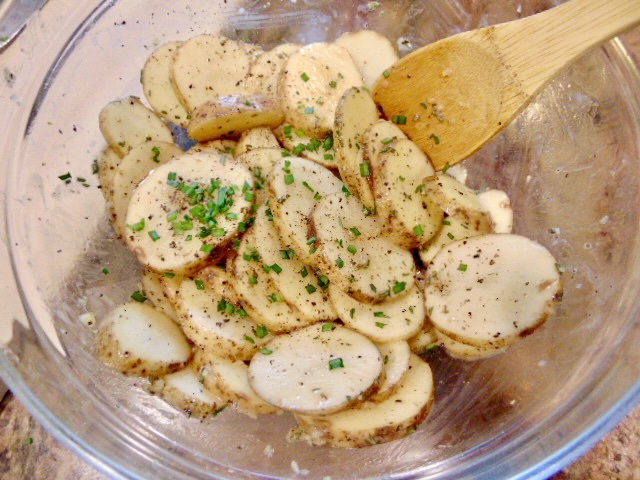
  2. Slice potatoes into thin rounds and place in a large mixing bowl. Add 3 tablespoons of melted butter and toss to coat evenly. Add 1/2 teaspoon of salt, 1/4 teaspoon of pepper, garlic, chopped rosemary, and chopped garlic chives. Mix it all together.
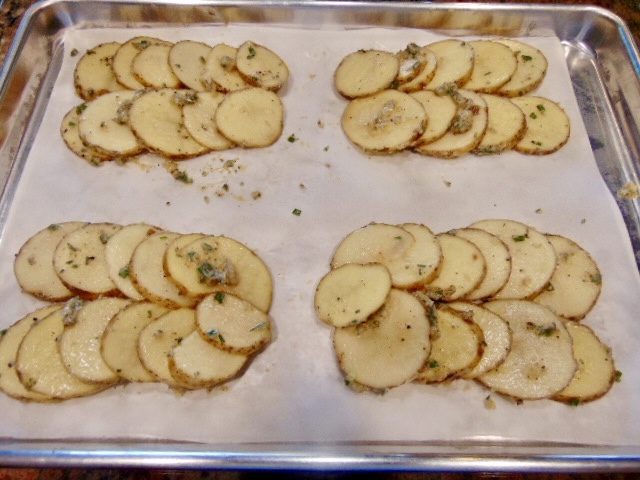
  3. Spread potatoes into four piles, fanning out each potato wedge so they overlap slightly. Bake for 30 minutes.
  4. While potatoes are cooking, pat cod fillets dry with a paper towel. Use plenty of salt and fresh ground black pepper on the cod. 
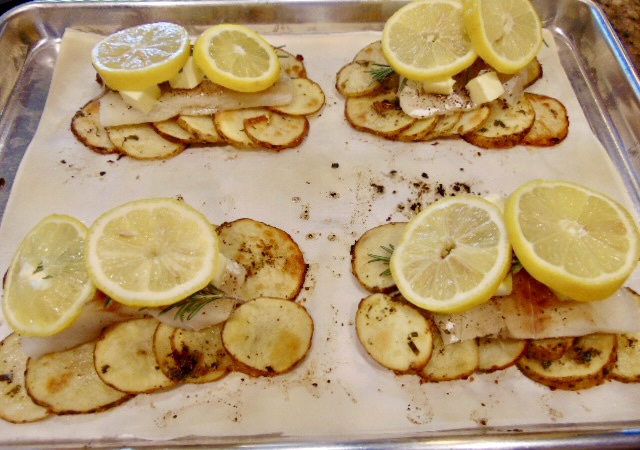
  5. Place a cod fillet on each cooked potato pile. Add 1 T. cubed butter on each fillet. Then place a sprig of rosemary, and two slices of lemon.
  6. Bake the cod and potato piles for an additional 15 minutes.
  7. Use a spatula to transfer each cod/potato pile to plates.
  8. Remove rosemary before eating, and squeeze the lemon slices over the cooked cod.
  9. Enjoy!   


dsc00962

dsc00963

dsc00964

dsc00965

Food, mustard seed sentinel

Turkey Pot Pie

dsc00145

You may have some leftover turkey in the near future, and you may want something new to do with all that meat. Turkey pot pie is a great way to use up leftovers from your Thanksgiving meal. It comes together easily and is so satisfying. A flaky, buttery crust wraps the savory turkey filling like a delicious present. 

Meat pie is a very old food with roots as far back as ancient Greece and Rome. I think they were on to something pretty fantastic all those years ago. Many cultures around the globe have their own version of meat pie. We love meat in a pastry shell in America too. Pot pies have stood the test of time. Turkey pie is a classic.

This turkey pot pie recipe is absolutely scrumptious. There’s plenty of meat, and the sauce in the filing is creamy and flavorful. The delectable crust brings all the flavors and textures together beautifully. My family gave this recipe their stamp of approval. I think your family will love this savory pie too. Turkey pot pie is good old fashioned comfort food.

Happy Eating!

In everything give thanks; for this is God’s will for you in Christ Jesus. 

1 Thessalonians 5:18

dsc00153

Turkey Pot Pie 

Ingredients

1 double pie crust – homemade or store bought

1 medium onion – diced

2 carrots – diced

2 ribs of celery – diced 

4 cloves crushed garlic

6 tablespoons butter

⅓ cup flour

2 cups chicken stock

½ cup heavy cream

2 teaspoons salt

½ teaspoon pepper

1 ½ teaspoons poultry seasoning

1 teaspoon fresh thyme 

3 cups cooked shredded turkey 

1 cup frozen peas

1 egg – beaten for egg wash

Instructions

  1. Preheat oven to 425°
  2. In a large pot melt the butter over medium heat. Add onions, carrots, celery, and garlic. Cook the veggies until they are soft, about 5 minutes. 
  3. Add the flour, and stir continually for 2 minutes.
  4. Add the chicken broth and heavy cream. Bring to a simmer and cook for a few minutes until it’s thickened. Stir constantly. Add salt, pepper, poultry seasoning, and thyme. Taste, and adjust spices as needed.
  5. Stir in cooked turkey and frozen peas. Remove from the heat. Let that sit while you prepare the pastry.
  6. Roll out one pie crust disk into a 12 inch circle. Roll up the pie dough onto your rolling pin and transfer to a 9 inch pie pan. Carefully let the dough fall into place. Gently press the dough into the pie pan. 
  7. Add the turkey pie filling to the prepared pastry filled pie pan.
  8. Roll out your second pastry disk into a 10 inch circle. Use the rolling pin to transfer the dough on to the top of the filled pie. 
  9. Cut the top and bottom dough ½ an inch beyond the pie plate. Pinch the top and bottom crusts together to seal the pie. Crimp the crust. Place a finger against the inside edge of the pie dough, then use the thumb and index finger of the other hand to press the pastry into flutes.
  10. Cut 4 to 6 two-inch slits in the top of the pie to vent. Brush the prepared pie with egg wash.
  11. Bake for 30 to 35 minutes until the crust on top is golden brown.
  12. Cool for 15 minutes before serving.

Notes

  • You can use both white and dark turkey meat. You can also use chicken.
  • Use green beans or other vegetables if you prefer.
  • If the crust is getting too dark while cooking, cut a 4 inch circle in the center of a square piece of aluminum foil. Loosely place on the pie while it finishes cooking. 
  • You don’t have to crimp the edge of the pie. It just looks prettier crimped.

dsc00130

dsc00131


Homemade Pie Crust 

Ingredients

2 ½ cups all purpose flour

¼ teaspoon salt

1 cup cold butter, diced

1 cup cold water

1 egg


Instructions 

  1. In a large mixing bowl add flour and salt. Stir to combine.
  2. Add the cold butter. Using your hands mix the butter and flour. Grab the mixture and rub it to break it into smaller pieces until it’s a coarse crumb.
  3. Combine the egg and water in a measuring cup. 
  4. Pour about half the egg mixture into the flour and butter. Using your hands combine until a soft dough forms. Add more of the egg and water as needed. It will come together quickly. Do not over mix. Do not knead the dough. Just bring all of the ingredients together. It should not be crumbly, and it should not be wet. 
  5. Once it’s combined divide the dough into two portions. Flatten each portion into a disk shape and cover in plastic wrap. 
  6. Refrigerate for an hour. Leave the dough on the counter for 20 minutes to soften up a bit before rolling it out.


Notes

  • Pie dough can be kept in the refrigerator for 48 hours and freezer for up to 6 weeks.
  • Do not stretch pie dough when placing it in a pie pan. Stretching the dough causes shrinkage while baking. 
  • I always use salted butter. Use unsalted if you prefer. 
  • Keep butter and water cold.     

dsc00129

img_3715


For this recipe and all of my recipes go to Mustard Seed Sentinel, Meghan’s Corner.

https://www.mustardseedsentinel.com

Faith, Food, Uncategorized

One Pot Lasagna

IMG_2414

My mom made the best lasagna. As kids, we would request her famous lasagna for our birthday dinners. I attempted my mom’s lasagna once, when I was first married. She stayed on the phone, and talked me through each step. It turned out delicious. I made a second attempt on my own, and it wasn’t so great. I didn’t make it again.

Several years ago I came across one pot lasagna. It has everything I love. It’s Italian, simple, and my family will actually eat it. I cautiously gave it a try, and was surprised by the results. The lasagna turned out well. How could something so simple be so delicious? I didn’t stand at the stove cooking sauce for hours. There is no boiling of lasagna noodles, and then laying them out separately, before you even begin assembling your lasagna. Did I actually make a scrumptious, savory, edible lasagna? Yes! I did. And you can too. 

Just like the title says, it really only uses one pot. Honestly, this recipe holds up against traditional lasagna quite well. It may even be better. I can’t believe I just said that. I’ve had lasagna where the sauce cooked for twenty four hours, and it was very good. One pot lasagna is just as good, in my opinion, and way easier to make. 

Give your family a hearty satisfying meal with this fantastic lasagna.


Happy Eating!


Now these three remain:

faith, hope, and love.

But the greatest of these is love.

1 Corinthians 13:13


One Pot Lasagna


1 to 2 Tbsp Olive Oil

½ medium yellow onion, chopped

1 lb. ground beef

1 lb. mild Italian sausage

8 Oven Ready lasagna noodles (broken into pieces)

1 (28oz.) can crushed tomatoes

1 (8oz.) can tomato sauce

3 to 5 cloves of crushed garlic

½ cup water

1 tsp. salt

1 tsp. pepper

½ tsp. sugar

1 tsp. basil

1 tsp. oregano

1 tsp. Italian seasoning

1 (7.5oz.) ricotta cheese

6 oz. shredded Mozzarella


  1. In a large skillet (at least 12”), saute onions over medium-high heat in olive oil until translucent.
  2. Add in ground beef and Italian sausage. Once the meat is cooked, drain off fat.
  3. While the meat is cooking, add the crushed tomatoes in a large bowl with the tomato sauce and the ½ cup water. Season the tomato mixture with sugar, basil, oregano, Italian seasoning, garlic, salt and pepper.
  4. Add lasagna noodles that have been broken into large pieces on top of the drained meat mixture. Do not stir. Just make an even layer of the noodles.
  5. Pour sauce mixture over the broken up noodles. Do not stir. Bring to a simmer, reduce heat to low, cover and cook for 10 minutes.
  6. After 10 minutes, remove the lid and gently stir. Separate any noodles that are stuck together.
  7. Replace the lid, and simmer an additional 10 minutes, stirring occasionally.
  8. After the second 10 minutes. Turn off heat, remove the lid, stir well and separate any stuck noodles.
  9. Put spoonfuls of ricotta cheese evenly over the top. Cover and let it sit, off heat, for 5 minutes.
  10. Sprinkle mozzarella on top and place under the broiler for 3 to 5 minutes until cheese is melted and browned.


Notes

* You can use plain ricotta cheese or you can add herbs for more flavor.

* Make sure to use a large oven safe pan.

* To save time, mix up your tomato sauce before you begin cooking.

* Adjust the spices to your taste.

* Break the dry lasagna noodles into approximately 2 inch sized pieces. 


Check out my monthly column at Mustard Seed Sentinel. You can get this recipe and more. Go to the “More” tab and scroll down to Meghan’s Corner.

https://www.mustardseedsentinel.com/post/meghan-s-corner-one-pot-lasagna