Food

S’mores Bars

dsc00871

I love s’mores. When our kids were little, camping was a summer tradition that included campfires and s’mores. There is something so heavenly about toasted marshmallow and chocolate sandwiched between two graham crackers. Kuddos to a Girl Scout troop leader, from many years ago, for creating this lovely treat. It’s now a classic.

I have been experimenting with these wonderful bars since last summer. I wanted all the goodness of a s’more without the use of a campfire. After many attempts and tweaks, I feel good about sharing this winning dessert with all of you. It’s so simple, yet full of the perfect amount of sweetness to put a smile on your face.

No fire is required, just the heat of your oven. The Hershey chocolate bar is essential to get that nostalgic taste. Feel free to use chocolate chips if you prefer. Use as much or as little marshmallows. Tweak the toppings to your liking. Bring this to a barbecue or a potluck for a fun treat. To all my s’more loving friends out there, you will love this one. Enjoy!

Happy Eating!

Blessed are the peacemakers: for they shall be called the children of God. Matthew 5:9

dsc00875

S’mores Bars

Ingredients

3/4 cup salted butter ( 12 tablespoons) softened

1/2 cup granulated sugar

1/2 cup brown sugar

1 egg yolk

2 sleeves of graham crackers ( use 14 for the crust and the remaining 4 crackers for the topping)

6 Hershey chocolate bars (regular size)

10 oz. bag of mini marshmallows

Instructions

  1. Preheat oven to 350°. Line a 9 x 13 pan with parchment or aluminum foil.
  2. Place 14 graham crackers for the crust in a food processor to make fine crumbs. Break up 4 graham crackers into bigger chunks and save for the topping.
  3. Using a hand mixer, cream butter and sugars. Add the egg yolk, and the graham cracker crumbs. Mix until combined. Press the crust mixture evenly into pan.
  4. Bake crust for 20 to 25 minutes, until lightly brown. Let cool for 5 minutes.
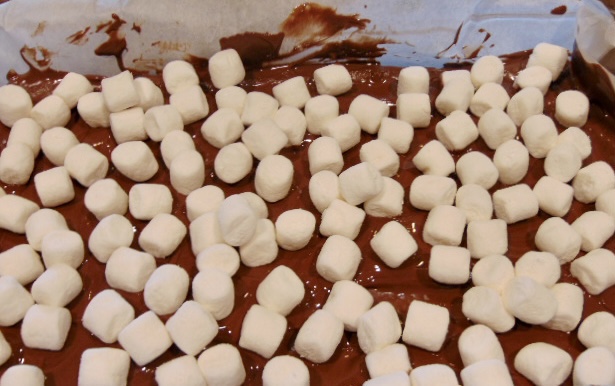
  5. Place 6 Hershey bars on the hot crust. As the chocolate melts use a rubber spatula to spread out evenly.
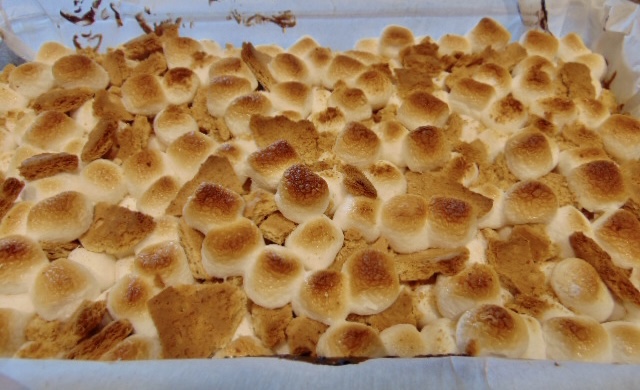
  6. Sprinkle approximately 1 to 2 cups of the marshmallows on the melted chocolate. Now sprinkle about half of the broken graham cracker crumbs on top. Add another 1/2 to 1 cup of marshmallows on top of that. Now add the remaining graham cracker crumbs.
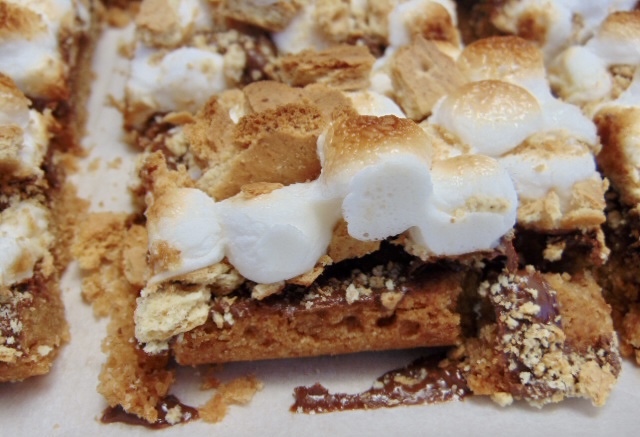
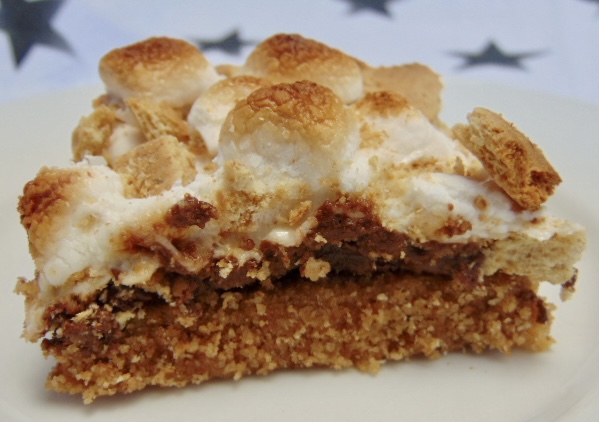
  7. Change the oven to broil on low. Put the bars under the broiler for 2 to 3 minutes depending on how toasted you want the marshmallows. Stay by the oven and watch. Marshmallows can burn quickly. Let cool. Cut into bars and enjoy!

Notes:

  • Place the warm bars in the fridge to speed up cooling.
  • Spray a knife with cooking spray for easier cutting.
  • Store at room temp to keep the marshmallows soft.
  • Extend the foil or parchment over the edge of the baking dish and then pull the bars out when you are ready to cut.
  • Use as much or as little marshmallows as you prefer.
  • If you don’t have a food processor, use a freezer bag and a rolling pin to smash the graham crackers.

dsc00862

dsc00863

dsc00864

dsc00865

dsc00866

dsc00867

dsc00868

dsc00869

dsc00870

Faith, Food, Uncategorized

Sheet Pan Italian Chicken

img_2448

It’s easier to find some chicken at the stores right now than toilet paper. Though I hope you have plenty of both. I also hope and pray that you and your family are healthy and well. These are uncertain times, but God is bigger than coronavirus. He will get us through this. 

And yes, people are going a wee bit crazy. Panic buying. We’ve all seen the empty toilet paper shelves, among other essentials. Let’s all take a collective deep breath together. That’s better. We are going to make it, by the grace of God. Yes, it’s tough right now with so many unknowns, but God knows. We can trust God completely. So, keep your head up, your hope fixed on Jesus, and know this will end. 

You may be cooking more than usual lately, and I want to help you out. This super simple chicken dinner is fantastic. Veggies and meat are cooked together in one pan. Easy and nutritious.  Your kids will love it. Your spouse will love it. Your family will praise you for making such yummy food. 

If you’ve already got some chicken in the freezer then all you will need is some fresh green beans and Roma tomatoes. Or, you can swap out the vegetables for ones you’ve got on hand. I’ve been able to get fresh produce at my local grocery store, and I hope you can as well. The fresh veggies make this dish so appetizing. 

Get your kids involved by having them trim the ends of the green beans, or help measure the ingredients for the marinade. My youngest son, who’s fourteen, usually cuts the green beans for me. Add a salad, some potatoes, or rice, and your meal is complete. Have fun with this one.

Happy Eating!


The Lord is my light and my salvation—

    whom shall I fear?

The Lord is the stronghold of my life—

    of whom shall I be afraid?

Psalm 27:1


Sheet Pan Italian Chicken

4 to 6 boneless, skinless chicken breasts

6 Roma tomatoes

1 lb. fresh green beans


Marinade

1 cup olive oil

⅓ cup balsamic vinegar

6 cloves minced garlic

1 tsp. Italian seasoning

1 tsp. Basil

1 tsp. salt   

½ tsp. black pepper


  1. Preheat the oven to 425° and spray a large sheet pan with cooking spray.
  2. In a mixing bowl whisk together the ingredients for the marinade. Set aside.
  3. Trim the ends off the green beans and slice the tomatoes lengthwise into 4 to 6 pieces each. Place the vegetables in a large freezer bag.
  4. Place the chicken in a large freezer bag. Pour half the marinade over the chicken. Seal the bag and move the chicken around to give it an even coat. Place in the refrigerator for 30 minutes, or up to 8 hours. 
  5. Pour the remaining marinade over the vegetables and let that sit on the counter. (Place the vegetables in the refrigerator if you plan to cook several hours later).
  6. Set your chicken on the counter for about 20 minutes before you put it in the oven.
  7. Place chicken on the sheet pan first, then fit the veggies around the chicken. Throw out the excess marinade. Sprinkle salt and pepper on everything before it goes in the oven. 
  8. Bake for 35 minutes.


Notes

  • Use cherry tomatoes instead of Romas.
  • Experiment with different vegetables.
  • Add fresh parsley when it comes out of the oven.


Get this delicous recipe and all of my recipes at Mustard Seed Sentinel. Go to the “More” tab and scroll down to “Meghan’s Corner”.

https://www.mustardseedsentinel.com/post/meghan-s-corner-sheet-pan-italian-chicken

Food, Uncategorized

Charcuterie Board

IMG_0823

Charcuterie (pronounced shar-koo-tuh-ree) is the French word for pork-butcher shop. Now say charcuterie ten times. It’s the art of preparing cured meats. In fifteenth-century France, charcutiers shop windows were filled with all sorts of cooked and cured pork since they were not allowed to sell uncooked pork. French charcuterie involves pates, mousse, and things like rillettes. 


Today, charcuterie has taken on a whole new meaning. It’s no longer just meat. You can find charcuterie everywhere from Instagram to restaurants. It’s made a comeback and I am thrilled. This is my kind of eating. Unpretentious, grab what you like, kind of eating. The sky’s the limit with what foods you place on your charcuterie board.


There are no rules or complicated recipes to follow. You can use cutting boards, plates, or a large serving tray like I did. Add cured meats, cheeses, bread, fruit, nuts, or whatever suits your fancy. And, there is no cooking involved! Charcuterie can be a creative appetizer or a meal. I had so much fun making this charcuterie board and I hope you will make one too.


Wow your guests during the holidays with charcuterie.  They will think you are the coolest host in the world. No more spray cheese and stale crackers for you. Not that cheese from a can is all that bad on occasion, but this time you’re going big. You’re going grand. It’s time to change things up when it comes to appetizers. If you’re not ready to take the leap, then by all means stay safe. But, I really hope you at least try and make your own charcuterie board. You won’t be disappointed. 


Happy eating!


The Lord bless you

    and keep you;

the Lord make his face shine on you

   and be gracious to you;

the Lord turn his face toward you

    and give you peace.

Numbers 6:24-26

  IMG_0828


Charcuterie Board

Here is the list of food I used for my board:


  • red grapes
  • strawberries
  • dried cranberries
  • blackberry preserves
  • pistachios
  • roasted almonds
  • chocolate covered pecans
  • colby jack cheese
  • sharp cheddar
  • provolone
  • blue cheese
  • brie
  • pepperoni
  • prosciutto
  • salami
  • marinated artichoke hearts
  • Kalamata olives
  • Spanish olives
  • assorted crackers


How to assemble your charcuterie board:

  • Start with placing any bowls of olives, sauces, or spreads on the board.
  • Next, place all meats.
  • Now add your cheeses.
  • Then add crackers or sliced bread.
  • Fill in with fresh and dried fruit.


My tips:

  • Lay parchment paper down first when using a tray.
  • Have both soft and hard cheeses.
  • Use both fresh and dried fruit.
  • Add variety with different colored and textured food.
  • Keep it simple if you’d like, with just meat, cheese, and bread. 


Have fun with your charcuterie board! Be creative and enjoy!


You can read my latest article in the link below. Check out Mustard Seed Sentinel for fantastic content.

https://www.mustardseedsentinel.com/post/meghan-s-corner-charcuterie-board