Food

Grape Tanghulu

You know what is missing from your life? Tanghulu. Grapes are sweet and delicious on their own, but adding a candy shell takes them to a whole other level. Tanghulu is skewered fruit covered in a hard candy coating. It is so satisfying to bite into the sweet crunchy outside and then experience a juicy ripe grape inside. It’s so good!

Tanghulu originated in Northern China during the Song Dynasty (960-1279). Traditionally it’s made from hawthorn or haw fruits. Nowadays there are a variety of fruits used like grapes, strawberries, and mandarin oranges. This popular Chinese street food can also be found in South Korea and Japan.

Visually, these little fruit kabobs are stunning with their shiny glass coats. Taste them, and you will quickly find out why they have been around for centuries. Tanghulu would be fun to make with kids.

Happy Eating!

Many plans are in a man’s heart, but the purpose of the LORD will prevail. Proverbs 19:21
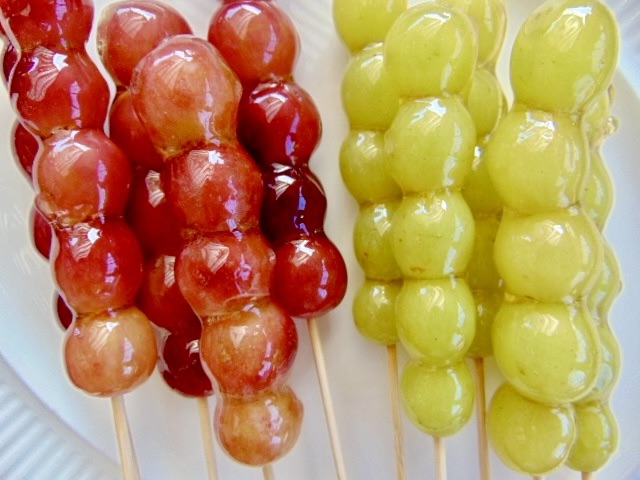
Grape Tanghulu 

Ingredients 

2 cups sugar 

1 cup water

grapes (approximately 75) 

Equipment needed:

bamboo skewers

parchment paper

candy thermometer

Instructions 

  1. Prep all the grapes by putting 5 grapes per skewer. Set aside.
  2. Line a baking sheet with parchment to use after dipping the fruit in the hot candy coating.
  3. In a medium sauce pan mix 2 cups sugar and 1 cup of water. Do not stir again. Heat over medium-high heat for approximately 20 to 30 minutes until the temperature reaches 300℉. The sugar will be an amber color and very bubbly when it’s ready. 
  4. You need to reach hard crack stage. If you do not have a thermometer, take one of the bamboo skewers without fruit on it, and dip it in the hot sugar, then dip it in cold water. If it is hard and cracks, the sugar is ready. If it’s still soft it’s not ready. 
  5. While the sugar and water is cooking, fill a large bowl with lots of ice and water.
  6. Once the sugar has reached hard crack stage, take the pan off the heat and immediately start rolling your prepared skewers in the hot sugar. Then put each skewer in the ice cold water bowl. The candy will harden immediately. Work quickly since the hot sugar will harden fast.
  7. Place each candy coated skewer on a parchment lined sheet pan to let some of the excess ice water drip off. 

Notes

  • Enjoy tanghulu right away.
  • Store them in the refrigerator for several days.
  • They freeze well and taste good frozen too.
  • Try other fruits like strawberries, or apples, or whatever you prefer.
  • Do not stir the sugar water once it’s cooking. Crystals can form if you stir the mixture. Just let it cook.
  • The skewers only need to sit in the ice water for maybe ten seconds to harden the candy and cool the outside. It’s ok if they sit in the ice water while you finish the rest of the skewers. 

Food

Lime Icebox Cake

If you love cake like I do but don’t want to turn on the oven during the hot summer months, then an icebox cake will do the trick. What is an icebox cake? It’s a no-bake cake made from layers of cookies and whipped cream. The cookies soften as it sits in the refrigerator overnight creating a cake-like texture. This scrumptious cake tastes a lot like a key lime pie.

Carlota de limón (Mexican lime icebox cake) uses Maria cookies and that’s what I use. Maria cookies are similar to graham crackers. The Mexican version of this cake uses evaporated milk, which you can use. I chose heavy cream. Both are very good. If you cannot find Maria cookies use graham crackers instead.

This easy yet impressive dessert will delight your family and friends.

Happy Eating!

And without faith it is impossible to please God. For anyone who approaches Him must believe that He exists and that He rewards those who earnestly seek Him. Hebrews 11:6

Lime Icebox Cake

Yield: 9 servings

Ingredients

One (14 oz.) can of sweetened condensed milk

One (8 oz.)  cup of heavy cream

¼ cup fresh squeezed lime juice (3 to 4 limes)

1 tsp. lime zest (1 lime)

1 ½ sleeves of Maria cookies (10 oz.) 

Optional Garnish:

Whipped cream

Lime zest

Lime slices

Maria cookies 

Instructions

  1. Zest 1 or 2 limes to get 1 teaspoon. Juice 3 to 4 limes to get ¼ cup. 
  2. Add the sweetened condensed milk and heavy cream to a mixing bowl and gently whisk for a minute. Add the lime zest and juice. Whisk for an additional couple of minutes until the mixture is thickened.
  3. Using an 8×8 baking dish pour a small amount of the filling on the bottom. Add a layer of the Maria cookies, breaking them into smaller pieces if needed to fill in.
  4. Pour another layer of the filling, approximately ¼ to ⅓ cup on top of the cookie layer. Continue layering cookies and lime filling until it’s all gone, ending with just the lime mixture on the top. You should have 3 to 4 cookie layers, depending on your preference.
  5. Cover with plastic wrap and refrigerate for a minimum of 4 hours up to overnight.
  6. Enjoy your delicious icebox cake within a few days.

Notes:

  • The filling will thicken as you whisk everything together, but it will still be a little runny. It will thicken as it sets up in the fridge.
  • Use a pie plate, or any baking dish you prefer.
  • One sleeve of Maria cookies will make 3 layers in an 8×8 pan.

Food

Pavlova

dsc01140-1

Pavlova is a fantastic meringue dessert that melts in your mouth. It’s light, airy, and crunchy on the outside, with a soft marshmallow inside. The addition of whipped cream and fruit makes this dreamy confection absolute perfection, in my opinion.

You can make your very own pavlova. It may look and sound intimidating to make a meringue cake, if you’ve never made one, but you can do it! With a few simple ingredients, in no time you will have a beautiful dessert for your next holiday, or gathering, or just to enjoy yourself.

And, a little side note on the origins of this wondrous treat; there is debate whether pavlova came from Australia or New Zealand. Either way, it’s delicious. The name is from Russian ballerina Anna Pavlova. Traditionally, it’s topped with passion fruit, but you can use whatever fruit you like. A little history lesson. Now, on to the recipe we go.

Happy Eating!

Have I not commanded you? Be strong and courageous. Do not be afraid; do not be discouraged, for the LORD your God will be with you wherever you go. Joshua 1:9

dsc01139-1

Pavlova 

Special equipment needed: stand mixer or hand mixer

Ingredients

4 egg whites at room temperature

1 cup granulated sugar

1/2 Tablespoon corn starch

1 teaspoon white vinegar

1 teaspoon vanilla

Instructions 

  1. Preheat oven to 200°.
  2. Line a baking sheet with parchment and trace a 9-inch circle around a baking pan onto the paper. 
  3. Using the whisk attachment, place room temp egg whites in your mixing bowl and start the mixer on low. Mix for about 2 minutes until the egg whites get foamy.
  4. Now turn up the mixer to medium until you get soft peaks. The egg whites will be fluffy and hold their shape. This will take several minutes.
  5. Next, slowly add the sugar a spoonful at a time while the mixer is running at medium speed. Wait about 30 seconds between each spoonful as the mixer runs. 
  6. Once all the sugar has been mixed in, turn up the mixer to medium high until you get stiff peaks, and the mixture is thick and glossy. Check that all the sugar is dissolved by taking some of the mixture between your thumb and forefinger to feel for granules. Continue mixing until all sugar is dissolved and stiff peaks have formed. 
  7. Now add the corn starch, vinegar, and vanilla and mix on low just until incorporated. 
  8. Spoon the meringue onto the 9-inch circle on the parchment paper leaving a small shallow spot in the middle with the edges being slightly higher. 
  9. Bake for 1 hour, then turn off the oven, leaving the meringue in the oven for another hour. After the 2 hours you can take the meringue out of the oven or you can leave it in the oven overnight. 
  10. When you’re ready to serve the pavlova top with whipped cream and fresh fruit. Enjoy!

Notes

  • Cracks in a pavlova are quite normal and it will still taste delicious.
  • Add the whipped cream and fruit right before serving or slice individual pieces and add toppings separately. The pavlova will start to soften once fruit and cream has been added so it will lose some of its crispness. 
  • Store a decorated pavlova in the refrigerator for up to 2 days. A plain pavlova with no whipped cream or fruit can be kept in an airtight container in the pantry for 2 days. 
  • Vinegar and corn starch will stabilize the pavlova and help prevent weeping.
  • Leaving the pavlova in the oven overnight to slowly cool will help prevent cracks.

img_6879

Soft peaks.

img_6880

Stiff peaks.

img_7869

Trace a circle on the parchment paper.

img_7870

Ready to go in the oven. Make lots of swirls as they add great texture.

img_7871img_7872

Once the pavlova is cooked it will still look glossy, just slightly dull.

dsc01133-1

Top with whipped cream and berries. Enjoy!


Photo credits: Meghan E. White 

Faith, Food, Uncategorized

Millionaire’s Shortbread

img_2796

One bite of this rich dessert won’t make you wealthy, but it will make you smile. Buttery shortbread crust, a soft caramel center, topped with dark chocolate, and a sprinkle of sea salt make this bar worth a million. I would pay top dollar at a bakery for this delicacy.

Do you like Twix candy bars? This decadent little bar is similar, but even better than the store bought treat. It’s worth the effort to make these indulgent goodies. The trickiest part is the caramel. If you cook the caramel for too long it will be tough. It’s also quite easy to burn caramel. Just follow the directions for the caramel, and you’ll do fine.

Let me encourage you in your cooking and baking endeavors. Each winter I teach a cooking class to kids ages twelve and up. My students this year, most of whom had never cooked, made this recipe. They did a phenomenal job. There was no burned caramel. The kids all cooked it beautifully. If they can do it, and I can do it, you can do it too. 

Millionaire’s shortbread is a special treat that lives up to its name. Make it for your family, your friends, your neighbors, or anyone who could use some happiness. Chocolate and caramel are always a winning combination.

Happy Eating!


Delight yourself in the Lord,

 and he will give you the desires of your heart.

Psalm 37:4 


img_2786

Millionaire’s Shortbread


Shortbread Crust

¾ cup butter (softened)

⅓ cup sugar

1 ⅓ cup flour


Caramel

½ cup butter

½ cup brown sugar 

½ cup sweetened condensed milk

2 tablespoons regular pancake syrup 


Chocolate

1 ½ cups dark chocolate chips

1 tablespoon butter 


Directions:

1. Preheat oven to 350°

2. Line an 8 x 8 baking dish with foil or parchment and leave enough over the edges to create a sling. This will make it easy to take it out of the pan and cut into bars.

3. Make the shortbread crust:

Mix the butter, sugar, and flour with a spoon until small crumbs form. Press evenly into the bottom of your pan.

Bake for 20 minutes until lightly golden brown.

Cool completely before adding caramel.

4. Make the caramel:

In a medium saucepan place butter, brown sugar, sweetened condensed milk, and syrup. Heat everything on low heat until the butter melts. Then turn up the heat to medium/medium high & bring it to a boil. Stir continually. (Be careful because caramel can burn easily) Once it’s at a boil, turn down to a simmer and stir continually until caramel turns an amber color & is slightly thickened. Turn off the heat & immediately pour hot caramel over the cooled crust. Cool before adding the chocolate.

5. Melt the chocolate:

Combine the chocolate and butter in an oven safe glass bowl. Melt in the microwave for 90 seconds total. Stop every 30 second and stir the chocolate. Pour the melted chocolate over the caramel layer. Let it set up completely before cutting. 

Optional: top with sea salt.


Notes

*Make the crust and cool completely before you make the caramel. If not, the crust will tear when you add the caramel.

*If the caramel gets little brown bits, it’s OK, it will still taste good.

*Place the shortbread in the refrigerator between layers to speed up cooling.

img_2799


You can read this article at the link below, and get all of my recipes on Mustard Seed Sentinel. Go to More and scroll down to Meghan’s Corner.

https://www.mustardseedsentinel.com/post/meghan-s-corner-millionaire-s-shortbread