Food

Pumpkin Spice Coffee Creamer

Love it or hate it, it’s pumpkin time. I love pumpkin spice coffee creamer and usually buy it in the fall. I’m a half and half in my coffee drinker, but I make an exception for the spicy goodness of this flavorful creamer. If you love pumpkin spice coffee creamer like I do, you can just as easily make your own. It’s super simple.

A lot of coffee creamer recipes involve heating up the milk and sugar on the stovetop. This recipe involves zero cooking because you use sweetened condensed milk. There’s no sugar to melt. Simply whisk everything together and that’s it. You can adjust the spices to your likeness. Half and half works well in this creamer, but use your preference of milk.

The flavor of this homemade creamer is more subtle than the store bought stuff, but very good in my opinion. It’s nice to make your own creamer and know exactly what ingredients are inside. Pumpkin spice coffee creamer would make a nice hostess, teacher, or holiday gift.

Happy Eating!

For we brought nothing into this world, and it is certain we can carry nothing out. 1 Timothy 6:7

Pumpkin Spice Coffee Creamer

Ingredients 

1 (14 oz.) can sweetened condensed milk

1 3/4 cup half and half 

3 Tbsp. pumpkin puree

1 tsp vanilla extract

1 tsp. cinnamon

1/2 tsp. nutmeg

1/2 tsp. ginger

1/4 tsp. cloves

Instructions 

  1. In a large mixing bowl combine sweetened condensed milk, half and half, pumpkin puree, vanilla, cinnamon, nutmeg, ginger, and cloves. Whisk until combined.
  2. Pour into a container with a lid. Refrigerate and shake before each use. Enjoy!


Food

Lemonade

dsc01202-1

Fresh squeezed lemonade on a hot summer day is so refreshing. With a little effort you can have a cool glass of ice cold deliciousness. It’s not difficult to make homemade lemonade, and you may become addicted, like me. With some lemons, sugar, and water you’ve got sweet, tart, goodness in a glass.

Right now groceries are quite expensive, so that means lemons aren’t exactly cheap. Homemade lemonade would be a treat, but worth it, in my opinion. I completely understand if you don’t want to spend the extra money. However, for a few extra dollars, you will be happy with your purchase. I’m just giving you the simple recipe and it’s on you whether or not you decide to give it a try. I really hope you do!

When life gives you lemons, make lemonade.

Happy Eating!

Therefore I tell you, whatever you ask for in prayer, believe that you have received it, and it will be yours. Mark 11:24

dsc01201-1

Lemonade

equipment needed:

potato masher

citrus juicer and or citrus press

strainer

Yield: 2.25 quarts

Ingredients

12 medium sized lemons (10 lemons for 2 cups of juice and 2 lemons sliced)

1 1/2 cups sugar

7 cups water

Instructions

  1. Thinly slice 2 lemons and remove the seeds. Place one of the sliced lemons in a large mixing bowl. Add 1 1/2 cups of sugar. Mash the lemon and sugar together until the sugar is wet.
  2. Juice 10 lemons to get 2 cups of lemon juice. Pour the fresh squeezed lemon juice into the bowl with the mashed lemon and sugar. Add the 7 cups of water. Whisk together until the sugar is dissolved.
  3. Place a strainer over a large bowl, or the pitcher you will use, and pour the lemon/sugar/water mixture through the strainer.
  4. Add remaining lemon slices to the pitcher and enjoy!

Notes:

  • Don’t worry about seeds when you juice the lemons since everything will go through the strainer.
  • I strain the lemon mixture into a separate bowl before pouring it into a pitcher because I have spilled it when straining it directly into a pitcher.

img_8213

img_8214

img_8215

img_8216

img_8217

Food, mustard seed sentinel

Easy Tomato Soup

dsc00775

A warm bowl of tomato soup and a grilled cheese sandwich are the epitome of comfort food. I grew up eating tomato soup from a can, which is perfectly fine. Homemade tomato soup is so much better tasting than any canned soup. This simple recipe is delectable and easy to make. It’s also budget friendly.

You can make this creamy, or leave it with some tomato chunks. I prefer a creamy tomato soup so I use my immersion blender. If you don’t have an immersion blender you can use a regular blender, or even a potato masher. 

It comes together quickly, and smells incredible as it’s simmering away on the stove top. This would make a great weeknight dinner. Add some grilled cheese sandwiches, and you’ve got a hearty meal. You’ll be glad you made this delicious tomato soup.

Happy Eating!

Rejoice in the Lord always. I will say it again: Rejoice! Philippians 4:4

dsc00774

Tomato Soup

Yield: 6 to 8 servings

Required equipment: immersion blender or regular blender

Ingredients 

1 stick of butter (8 tablespoons)

1 medium onion cut into large chunks

2 (28 oz.) cans crushed or whole tomatoes 

2 cups chicken broth

½ to 1 cup fresh basil, chopped

1 tablespoon sugar (optional)

1 teaspoon salt

½ teaspoon or more of fresh ground black pepper

½ cup heavy cream

Instructions

  1. In a large pot melt butter over medium heat.
  2. Add the onion and cook for 5 minutes. 
  3. Add the tomatoes with their juices, chicken broth, fresh basil, sugar, salt, and pepper.
  4. Stir and bring to a boil. Turn down the heat and simmer uncovered for 30 minutes.
  5. Blend the soup using an immersion blender until creamy.
  6. Give it a taste and add more salt/pepper to your liking.
  7. Turn down the heat and stir in the heavy cream.
  8. Ladle soup into bowls. Enjoy!

Notes

  • If you use a blender just add the soup in small batches to the blender and return it back to the pot.
  • You can also use a potato masher if you don’t have an immersion blender. 
  • Dice the onion small and chop the basil if you are not using any type of blender.

dsc00759

dsc00762

dsc00764

dsc00770

To get more of my monthly recipes go to Mustard Seed Sentinel, Meghan’s Corner.

https://www.mustardseedsentinel.com/post/meghan-s-corner-easy-tomato-soup


Food

Cream Cheese Pound Cake

dsc00402

This is my favorite pound cake. It’s delicious and easy. I found this scrumptious dessert years ago in Southern Living magazine. I get asked for this recipe every time I make it. I shared this pound cake when I first started writing for Mustard Seed Sentinel, and wanted to share it again with new followers. 

Enjoy this delightful sweet treat. Life is short. Have a piece of cake.

Happy Eating!

Cream Cheese Pound Cake

Ingredients:

1 ½ cups butter, softened

1 (8oz.) package cream cheese, softened

3 cups sugar

6 large eggs

1 ½ teaspoons pure vanilla extract

3 cups all purpose flour

⅛ teaspoon salt

Directions:

1. Preheat oven to 300°

2. Beat butter and cream cheese at medium speed with an electric mixer for 2 minutes or until creamy; gradually add sugar, beating until mixture is light and fluffy.

3. Add eggs one at a time, beating until combined. Add vanilla extract, beat until blended.

4. Combine flour and salt in a small bowl; gradually add to butter mixture, beating at low speed just until blended after each addition. Don’t over mix.

5. Pour batter into a greased and floured 10-inch bundt pan or tube pan.

6. Bake for 1 hour and 25 to 30 minutes or until toothpick inserted in center comes out clean. Cool on a wire rack for 15 minutes. Remove from pan, and let cool completely for about an hour.

Notes:

~I prefer to use three loaf pans. Cooking time drops to approximately 1 hour 5 minutes when using loaf pans. You can freeze the loaves. Thaw before serving.

~Reduce the sugar to 2 ½ cups or 2 ¾  if 3 cups is too sweet. It still comes out yummy.

Food

Homemade Pasta

dsc00325

I love pasta and all things Italian. I have been making homemade ravioli for several years but recently expanded my pasta skills to fettuccine and spaghetti. My pasta machine makes this quite easy but you do not need any fancy equipment to make fresh pasta. I have made a lot of ravioli with a rolling pin and you can too.

You can very easily use a stand mixer with the dough hook attachment to mix your pasta dough. I prefer to knead the dough by hand. I can feel exactly when the dough is ready and it gives me a great upper arm work out.

Fresh pasta is not difficult to make, and it’s so delicious. It is a bit time consuming and does make a mess with all of the flour, but so worth it. Speaking of flour, there are several options for pasta.

Types of flour:

All-purpose flour is fantastic for pasta and most of us already keep that stocked in our pantry. Semolina flour is a preferred choice for pasta. Double zero flour is very fine and another excellent choice for pasta. I like to mix half semolina and half all-purpose flour for my pasta. I have also just used all-purpose flour and it’s still very good. Experiment. Maybe start with all-purpose flour before you venture out into the many flour choices for pasta. Don’t get me started on all the Italian flours.

dsc00304

If you don’t have a pasta machine:

I mix my pasta by hand and then use my pasta machine to cut into whatever shape I need. If you do not have a pasta machine just use a rolling pin and a sharp knife. Roll the dough to the desired thickness, then cut into four pieces. Take each section of dough and roll it up like a flat log. Slice into desired width and voila, you’ve got bite sized pieces of dough.

dsc00306

Mix your dough right on the counter if you’re doing it by hand. A mixing bowl will work just fine too.

Pasta

Ingredients:

1 1/2 cups flour (half AP flour and half semolina flour)

1/2 teaspoon salt

2 eggs beaten

2 tablespoons water

2 tablespoons olive oil

Directions:

  1. In a large bowl mix the two flours and salt with a whisk until combined.
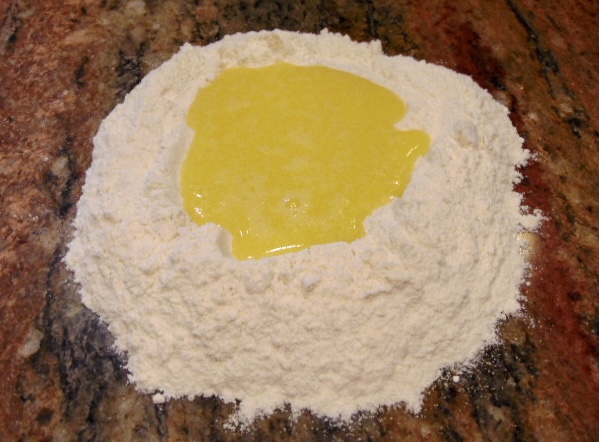
  2. Carefully pour the flour mixture on your counter. Make a well at the center.
  3. In a measuring cup beat 2 eggs. Add the water and olive oil to the eggs and mix.
  4. Pour at least half the egg mixture into the flour well.
  5. Use your hands and combine. Slowly add the rest of the egg mixture.
  6. This will be messy at first. It’s Ok. Just keep combining the flour and egg until it’s all incorporated. It will be sticky.
  7. If the dough is too sticky add a small amount of flour. If the dough is too dry add a small amount of water.
  8. Knead the dough for 10 minutes.
  9. It should be smooth and elastic. Not wet and not dry or crumbly.
  10. Form the dough into a ball and tightly wrap it in plastic wrap.
  11. Let it rest at room temperature for 30 minutes. Use the dough immediately, or refrigerate up to one day.
  12. Roll out the dough to desired thickness and cut by hand or use a pasta machine.

Using a pasta machine:

  1. Divide the ball of pasta dough into 4 sections. Wrap up the other 3 sections of dough you are not using to keep them from drying out.
  2. Use a floured cutting board or flour your counter and place the dough ball on the floured surface. Gently press the dough into a flat disk.
  3. Feed the dough through the pasta machine set at 1. Fold the dough into thirds and feed the dough back through the widest setting. Slowly decrease the setting on the pasta machine as you pass the dough through each time. I like to go to 7. Make your pasta as thick or thin as you like.
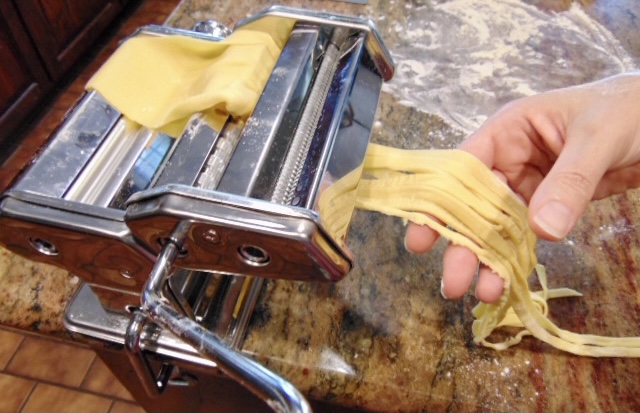
  4. Now feed the long thin dough sheets through the pasta cutter to make fettuccine or spaghetti. You can cut the dough sheets in half and make shorter pasta or leave them long.
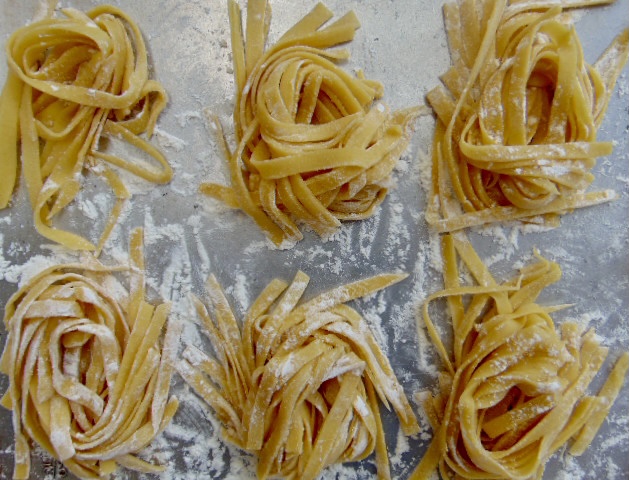
  5. Hang fresh cut pasta on a pasta drying rack or pile up the cut dough into little nests. Place each nest on a floured baking sheet to dry out.

dsc00307

dsc00308

dsc00310

dsc00311

Cooking fresh pasta:

Bring a large pot of salted water to a boil. Add fresh pasta and cook for 3 to 5 minutes.

Carefully separate your dough nests before placing them in the boiling water.

Al dente will be slightly firm. Cook the pasta longer if you prefer it more tender.

Keep an eye on your fresh pasta when cooking it. Fresh pasta cooks much faster than dried.

Storing homemade pasta:

Let your fresh pasta stay on the drying rack or baking sheet for about 2 hours at room temperature to dry out.

Refrigerate the fresh pasta for up to 2 days in an airtight container.

Freeze the fresh pasta for up to 2 weeks. Thaw it out before cooking.

dsc00318