Food, mustard seed sentinel

Turkey Pot Pie

dsc00145

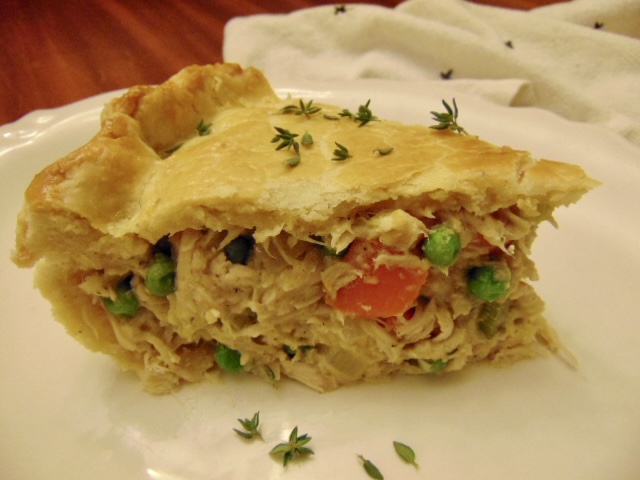
You may have some leftover turkey in the near future, and you may want something new to do with all that meat. Turkey pot pie is a great way to use up leftovers from your Thanksgiving meal. It comes together easily and is so satisfying. A flaky, buttery crust wraps the savory turkey filling like a delicious present. 

Meat pie is a very old food with roots as far back as ancient Greece and Rome. I think they were on to something pretty fantastic all those years ago. Many cultures around the globe have their own version of meat pie. We love meat in a pastry shell in America too. Pot pies have stood the test of time. Turkey pie is a classic.

This turkey pot pie recipe is absolutely scrumptious. There’s plenty of meat, and the sauce in the filing is creamy and flavorful. The delectable crust brings all the flavors and textures together beautifully. My family gave this recipe their stamp of approval. I think your family will love this savory pie too. Turkey pot pie is good old fashioned comfort food.

Happy Eating!

In everything give thanks; for this is God’s will for you in Christ Jesus. 

1 Thessalonians 5:18

dsc00153

Turkey Pot Pie 

Ingredients

1 double pie crust – homemade or store bought

1 medium onion – diced

2 carrots – diced

2 ribs of celery – diced 

4 cloves crushed garlic

6 tablespoons butter

⅓ cup flour

2 cups chicken stock

½ cup heavy cream

2 teaspoons salt

½ teaspoon pepper

1 ½ teaspoons poultry seasoning

1 teaspoon fresh thyme 

3 cups cooked shredded turkey 

1 cup frozen peas

1 egg – beaten for egg wash

Instructions

  1. Preheat oven to 425°
  2. In a large pot melt the butter over medium heat. Add onions, carrots, celery, and garlic. Cook the veggies until they are soft, about 5 minutes. 
  3. Add the flour, and stir continually for 2 minutes.
  4. Add the chicken broth and heavy cream. Bring to a simmer and cook for a few minutes until it’s thickened. Stir constantly. Add salt, pepper, poultry seasoning, and thyme. Taste, and adjust spices as needed.
  5. Stir in cooked turkey and frozen peas. Remove from the heat. Let that sit while you prepare the pastry.
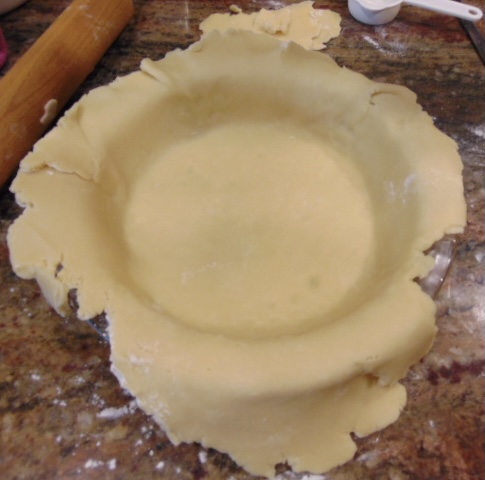
  6. Roll out one pie crust disk into a 12 inch circle. Roll up the pie dough onto your rolling pin and transfer to a 9 inch pie pan. Carefully let the dough fall into place. Gently press the dough into the pie pan. 
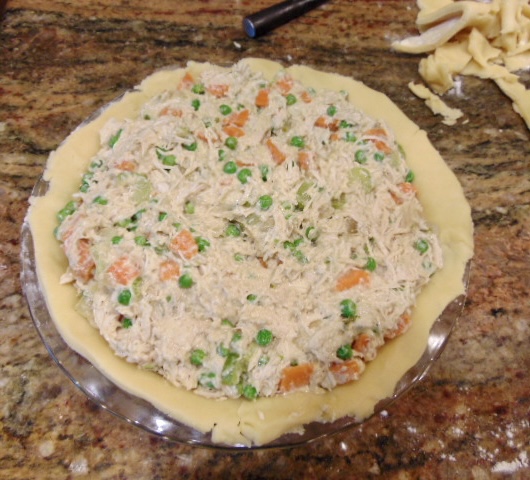
  7. Add the turkey pie filling to the prepared pastry filled pie pan.
  8. Roll out your second pastry disk into a 10 inch circle. Use the rolling pin to transfer the dough on to the top of the filled pie. 
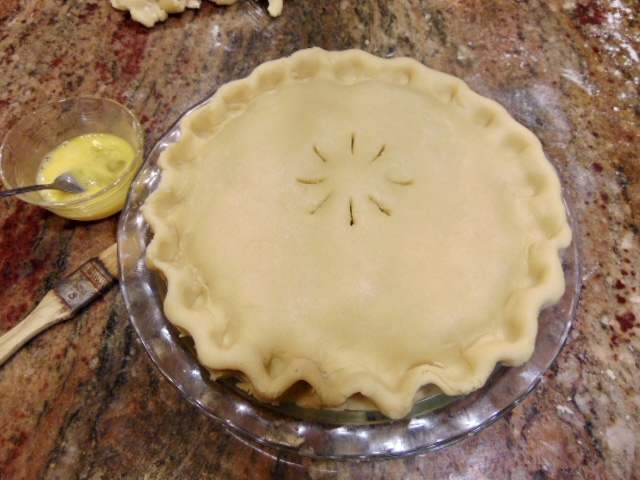
  9. Cut the top and bottom dough ½ an inch beyond the pie plate. Pinch the top and bottom crusts together to seal the pie. Crimp the crust. Place a finger against the inside edge of the pie dough, then use the thumb and index finger of the other hand to press the pastry into flutes.
  10. Cut 4 to 6 two-inch slits in the top of the pie to vent. Brush the prepared pie with egg wash.
  11. Bake for 30 to 35 minutes until the crust on top is golden brown.
  12. Cool for 15 minutes before serving.

Notes

  • You can use both white and dark turkey meat. You can also use chicken.
  • Use green beans or other vegetables if you prefer.
  • If the crust is getting too dark while cooking, cut a 4 inch circle in the center of a square piece of aluminum foil. Loosely place on the pie while it finishes cooking. 
  • You don’t have to crimp the edge of the pie. It just looks prettier crimped.

dsc00130

dsc00131


Homemade Pie Crust 

Ingredients

2 ½ cups all purpose flour

¼ teaspoon salt

1 cup cold butter, diced

1 cup cold water

1 egg


Instructions 

  1. In a large mixing bowl add flour and salt. Stir to combine.
  2. Add the cold butter. Using your hands mix the butter and flour. Grab the mixture and rub it to break it into smaller pieces until it’s a coarse crumb.
  3. Combine the egg and water in a measuring cup. 
  4. Pour about half the egg mixture into the flour and butter. Using your hands combine until a soft dough forms. Add more of the egg and water as needed. It will come together quickly. Do not over mix. Do not knead the dough. Just bring all of the ingredients together. It should not be crumbly, and it should not be wet. 
  5. Once it’s combined divide the dough into two portions. Flatten each portion into a disk shape and cover in plastic wrap. 
  6. Refrigerate for an hour. Leave the dough on the counter for 20 minutes to soften up a bit before rolling it out.


Notes

  • Pie dough can be kept in the refrigerator for 48 hours and freezer for up to 6 weeks.
  • Do not stretch pie dough when placing it in a pie pan. Stretching the dough causes shrinkage while baking. 
  • I always use salted butter. Use unsalted if you prefer. 
  • Keep butter and water cold.     

dsc00129

img_3715


For this recipe and all of my recipes go to Mustard Seed Sentinel, Meghan’s Corner.

https://www.mustardseedsentinel.com

Food

Mini Pumpkin Cheesecake

dsc00109

It’s the most wonderful time of the year. That’s right, it’s pumpkin time. If you are a pumpkin fan then you will enjoy these mini pumpkin cheesecakes. They are scrumptious. Not too much pumpkin for the non-pumpkin fans, yet just enough for the pumpkin lovers. 

This pumpkin cheesecake is light and perfectly sweet with just the right amount of spice. Toasted pecans add fantastic flavor and texture to the graham cracker crust. Each bite of these tiny goodies has the perfect mix of creamy and crunchy. 

The portions are the ideal size for a sweet treat. No fork required. These would look so beautiful on a cake stand for Thanksgiving. But you don’t need a special occasion to make these mini cheesecakes. Every day is a reason to be thankful so why not celebrate with pumpkin cheesecake. 

Make this simple yet impressive dessert for the holiday season or any time of the year. Experience the delight of cheesecake without all of the fuss. Enjoy this delectable small dessert. 

Happy Eating!

Seek the LORD and His strength; Seek His face continually. Psalm 105:4

dsc00103

Mini Pumpkin Cheesecake

Yield: 24 cheesecakes

Crust

1 and a half sleeves of graham crackers (approximately 12 graham crackers)

½ cup butter – melted

6 tablespoons brown sugar

1 teaspoon  cinnamon 

¼ cup toasted pecans


Pumpkin Cheesecake

16 oz. cream cheese – room temp

15 oz. can pumpkin puree

2 tablespoons sour cream

2 eggs – room temp 

1 cup sugar

2 tablespoons flour

1 teaspoon vanilla

½ teaspoon ginger

½ teaspoon nutmeg

½ teaspoon cloves

1 teaspoon cinnamon


Instructions

Make the crust

  1. Preheat oven to 350°
  2. Line muffin pan with paper cups. This recipe makes 24.
  3. Toast pecans in the oven on a baking sheet for 7 to 8 minutes.
  4. Place toasted pecans and graham crackers in a food processor and make fine crumbs. (If you don’t have a food processor you can place the graham crackers and pecans in a large plastic bag. Pound them with a rolling pin until crumbs form.)
  5. Place the graham cracker crumbs and pecans in a mixing bowl. Add melted butter, brown sugar, and cinnamon. Mix with a spoon or fork until combined.
  6. Put two tablespoons of the crust into each paper baking cup.
  7. Take a small glass or measuring cup and firmly press the crust in place.


dsc00073

Make the cheesecake

  1. Blend the cream cheese in a stand mixer with whisk attachment, or hand mixer, until smooth.
  2. Add the pumpkin and sour cream. Mix until well blended.
  3. Add the eggs. Blend until smooth.
  4. Add sugar, vanilla, flour, ginger, nutmeg, cloves, and cinnamon. Mix well.
  5. Using a large baking scoop or ice cream scoop, fill the crust lined cups with one full scoop each of cheesecake batter. About ¾ full. 
  6. Bake cheesecakes for 18 to 20 minutes. Turn the oven off, then leave the cheesecakes in the oven for an additional 20 minutes. Remove from the oven and let the cheesecakes cool completely. Store in the refrigerator. Top with fresh whipped cream and cinnamon or nutmeg. 


dsc00076

Notes

  • The mini cheesecakes will last for 3 days in the fridge or 2 months in the freezer.
  • If you don’t want pecans in the crust, just use 2 full sleeves of graham crackers.
  • You will have a little extra batter and crust to make an additional 4 to 6 cheesecakes.
  • The cheesecakes will puff up in the oven and get some cracks. These will go away once they cool completely.


dsc00112

Go to Mustard Seed Sentinel for this recipe and more. Check out my monthly column, Meghan’s Corner. 

https://www.mustardseedsentinel.com/post/meghan-s-corner-mini-pumpkin-cheesecake


Food, mustard seed sentinel

The Best Pasta Salad

img_3364

Have you ever been to a potluck where you took a scoop of some random person’s pasta salad, and it was mushy and flavorless? I have, and it was not a good experience. You take a bite, and then move on to whatever else is on your plate. The days of boring pasta salad are over. Today is an exciting day for pasta salad fans everywhere.

Even if you are not a fan of pasta salad, you will be after having this incredible one. This salad has no official name, so I have named it The Best Pasta Salad. It has wonderful flavors and texture. Cashews and celery add some delightful crunch. Red grapes, pineapple, and mandarin oranges create bursts of sweetness. The tangy dressing is subtle. 

There are ten ingredients, not including the dressing, for The Best Pasta Salad. It is a lot, but they all work together beautifully to create a flavorful salad. The chicken makes this recipe hearty. It really should be called a main dish because it’s so filling. 

This pasta salad has been used for baby showers, bridal showers, potlucks, barbeques, parties, and family meals. The original recipe I was given makes enough for at least twenty people. Cut the recipe in half if you do not want to eat pasta salad for a month. If you need a large dish for an event make the full recipe. It can feed an army, and there will still be leftovers. 

I am so pleased to share one of my all time favorite recipes with you. When I bring The Best Pasta Salad to any party I always get asked for the recipe. Now you can do the same, and pass it on to your friends and family. We are changing lives here, one delicious recipe at a time. 

Happy Eating!

For where your treasure is, there your heart will be also. Matthew 6:21 

img_3359


img_3357

img_3353

The Best Pasta Salad

1 (16 oz.) farfelle pasta 

1 (16 oz.) rotini pasta 

Cook and drain well

20 oz. can pineapple tidbits, drained

2 cups finely chopped celery

4 green onions chopped

1(5 oz.) package dried cranberries

2 cups red grapes cut in half

1 (10 oz.) package whole cashews

1 large can mandarin oranges, drained

6 cooked chicken breasts shredded or chopped

Dressing:

1 (16 oz.) Kraft Coleslaw Dressing and 1 cup mayonnaise mixed together.

There’s no exact order when making the pasta salad. The simplest thing to do is add the pasta and dressing first. Then add all the other ingredients and mix well.

Notes:

  • This recipe makes about 7 quarts.
  • Use a large bowl when making the full recipe.
  • Add the oranges last since they are the most fragile.
  • Cut this recipe in half for a smaller group. 

img_3358

Go to the link below to get this article and all my recipes at Mustard Seed Sentinel, “Meghan’s Corner”.

https://www.mustardseedsentinel.com/post/meghan-s-corner-the-best-pasta-salad

Food, mustard seed sentinel

Two Ingredient Homemade Ice Cream

I checked my calendar and it still says summer. That means we are legally allowed to eat ice cream. There are no laws about when to eat ice cream, but most of us enjoy this creamy treat in the hot summer months. We can do better than just consume some overpriced store-bought ice cream, we can make our own. 

This is the easiest homemade ice cream you will ever make. There is no ice cream machine involved, and no special equipment is required. If you have a stand mixer or a hand mixer, you can make this tempting ice cream. And it really only takes two ingredients to make the sweet, light, fluffy ice cream base. The rest is up to your taste buds and your imagination. 

I love to use my family as guinea pigs when I try new recipes. This one was so much fun to play with since the flavor possibilities are endless. To be safe for our first round, we stuck with some classics. We made strawberry, mint chip, coffee, cookies and cream, cookie dough, and vanilla. All six are delicious.

The consensus from my panel of taste testers, my husband and sons, is that this ice cream is a winner. My panel of judges raved about the light creamy texture, and yummy flavors. We are already planning our next batch with some fun new varieties. This homemade ice cream gets my families stamp of approval, and I think your family will love it as well.

Happy Eating!

Let the peace of Christ rule in your hearts, since as members of one body you were called to peace. And be thankful. 

Colossians 3:15

Two Ingredient Ice Cream

Ingredients:

1 pint heavy whipping cream

1 (14 oz.) can sweetened condensed milk

Instructions:

  1. In a large bowl, using the whisk attachment, beat whipping cream with a mixer until soft peaks form.
  2. Add sweetened condensed milk and whip on high until stiff peaks form.
  3. Divide up ice cream base in batches and add in flavors before freezing.
  4. Place prepared ice cream in air tight containers and freeze for 6 hours until it’s frozen solid.
  5. It can be kept frozen for up to 6 weeks.

Notes:

  • Soft peaks will take a few minutes and the cream will be thickened.
  • Stiff peaks will hold their shape and be firm. Be careful not to overmix.
  • Refrigerate the condensed milk beforehand.
  • You can purchase ice cream containers online, but they aren’t necessary.
  • This recipe will make 3 ½ pints (56oz) of ice cream.
  • Carefully fold in cookies, sprinkles, chocolate chips or whatever you want.

To get all of my recipes go to the link below. Go to More and scroll down to Meghan’s Corner. Mustard Seed Sentinel is an online faith-based magazine filled with all sorts of fantastic articles, written by accomplished, talented writers. Check it out and subscribe.

https://www.mustardseedsentinel.com

Food, mustard seed sentinel

Canned Tomatoes

img_2952

We had a large tomato harvest in our backyard garden this summer. There were so many that a quick decision had to be made on what to do with the tomatoes before they spoiled. Enter the canned tomato. This was my first time canning, and I loved it. 

There is something so satisfying about preserving food that you’ve grown. Even the basil in each jar is from our garden. I have a whole new respect for the generations before me who had no choice but to preserve their food for those long winter months. No wonder not a drop of food was wasted back in the day. Each morsel meant hard work was involved.

A few things to consider before you decide to take the plunge on this endeavor. It will make a decent sized mess in your kitchen. It will take at least two hours of your time. You don’t need a canning pot. The only tool you should purchase or borrow is canning tongs, and of course jars. 

If you have ever wanted to try canning, tomatoes are a great way to start. They are probably one of the least fussy foods to preserve. You will still need to sterilize your jars and lids, but there is less concern over botulism because tomatoes are a high acidic fruit. You will have your very own tomatoes on hand to make sauces, soups, stews, or any other tomato based recipe. 

I love trying new things and canning tomatoes surprised me with happiness. Tomatoes are a staple in my cooking, and now I have my own canned supply from my garden. If you decide to take the leap into canning like I did, send me your pictures. I’d love to see what you accomplished. You can do this!

Happy Canning!

I am the vine; you are the branches. If you remain in me and I in you, you will bear much fruit; apart from me you can do nothing. John 15:5

img_2944

img_2981

img_2980

img_2982

Canned Tomatoes


Ingredients

  • ½ to 1 lb. Roma tomatoes per each 16 oz. jar
  • 1 bottle concentrated lemon juice
  • fresh sprigs of basil


Instructions

  1. Prepare canning jars. Place jars and lids in simmering water for 10 minutes to sterilize them. The rings do not need to be sterilized and just need washed in warm soapy water. To make it easy, just leave the jars and lids in the warm water until you’re ready to fill them. 
  2. Remove the skins from the tomatoes. Wash tomatoes and make an “x” shape with a knife on the bottom of each one. Bring a large pot of water to boil and place scored tomatoes in the pot for a minute or two. When the skins start to tear, scoop out the tomatoes and place them in an ice water bath. Remove the skins, cut out the core, and slice the tomatoes into quarters. 
  3. Cook the tomatoes. Place one fourth of the tomatoes in a large pot. Bring to a boil over medium heat. Crush the tomatoes with a potato masher. Add the remaining tomatoes (do not crush these tomatoes) and boil for 5 minutes.
  4. Fill jars with cooked tomatoes. Add 1 tablespoon lemon juice concentrate per jar and one sprig of fresh basil. Fill jars with cooked tomatoes leaving ½ inch head space. Wipe the rims and place lids and rings on each jar until finger tight.
  5. Process jars in a hot water bath. Place the filled jars in a warm water bath covering them in at least an inch of water. Bring the water to a rolling boil and start timing. 40 minutes for pints and 45 minutes for quarts. Process times can vary depending on your altitude. https://nchfp.uga.edu/how/can_03/tomato_water_pack.html
  6. Remove jars and cool. Check lids for seal after 24 hours. Lids should not flex up and down when the center is pressed. You should hear a popping sound when they cool or even while they are boiling. Store canned tomatoes for up to a year. 


Notes:

  • Make sure to use canning tongs. It will make your job much easier and safer.
  • I used a stock pot when processing my cans since it was deep.
  • My jars are pint size (16 oz.) 
  • A wide mouth canning funnel is quite helpful when filling jars.
  • Use bottled lemon juice to ensure high enough acidity.
  • Add 2 tablespoons of lemon juice for quart size jars.


img_2988


Click on the link to get all of my recipes. Go to More and scroll down to Meghan’s Corner. Mustard Seed Sentinel is an online magazine filled with all sorts of fantastic articles. The contributors are accomplished, talented writers. Check it out and subscribe.

https://www.mustardseedsentinel.com