Christmas, Food

Hot Chocolate Bombs

dsc00696

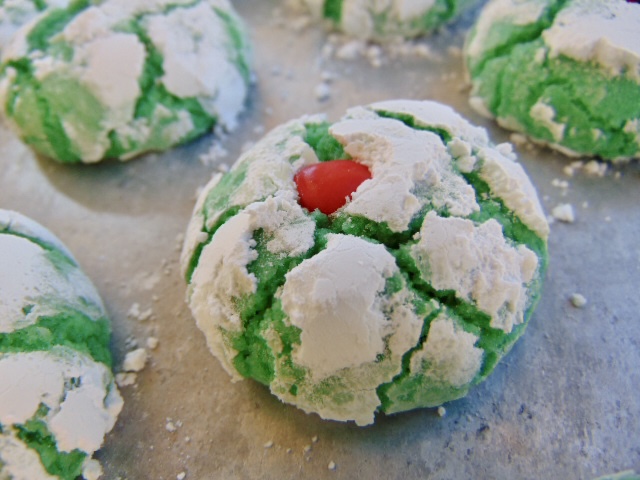
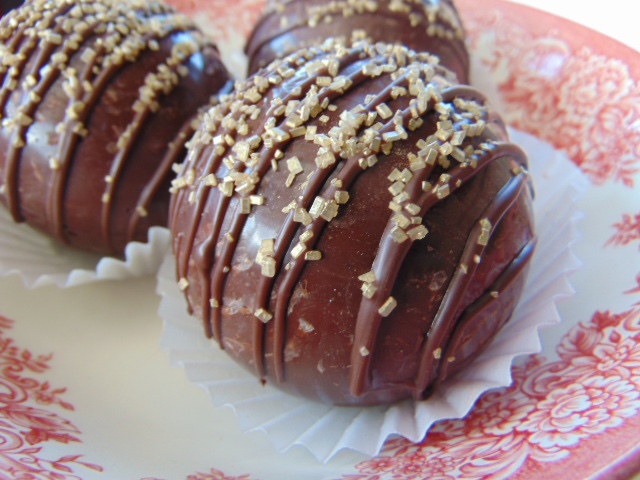
Hot chocolate bombs are the bomb. Pun intended. These gorgeous spheres of hot cocoa goodness explode with marshmallows and chocolate when hot milk is poured over them. It’s satisfying to watch the chocolate melt and reveal all the deliciousness from inside the bomb. 

I’m late to the game with this fun treat. Hot chocolate bombs are so 2020. I say better late than never. I love trying new things, and I was determined to make these bombs. It was trial and error for me. I made some mistakes with my first batch, and improved my technique with my second go round.

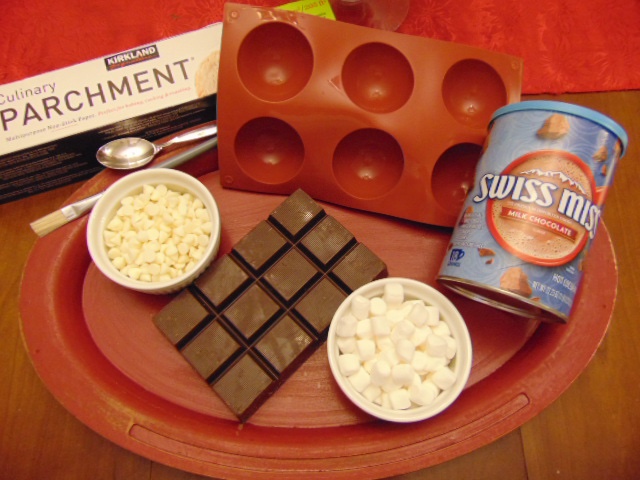
I am not an expert on making hot chocolate bombs. I am a complete novice. If I can make them, you can make them too! The one thing you absolutely need is a silicone mold. I got mine from Amazon. There are ways to make bombs without molds, but I don’t have experience with that. I’m sharing the simple way I made them.

Hot chocolate bombs are delicious. The milk makes the cocoa extra creamy and flavorful. They make lovely homemade gifts. Who wouldn’t enjoy a ball of chocolate filled with hot cocoa and marshmallows that you made for them? Hot chocolate bombs are a fun unique treat to make and share. Make some today!

Happy Eating!

Rejoice in the Lord always. I will say it again: Rejoice! Philippians 4:4

dsc00692

dsc00699

Hot Chocolate Bombs

Yield: 3 hot chocolate bombs (2 ½ inch sized)

Equipment

silicone 2 ½ inch semi sphere mold

parchment paper

pastry brush 

latex gloves (optional)

saucepan

heat proof bowl

cupcake liners

rubber spatula 

measuring cups

measuring spoons 

Ingredients

6 ounces chocolate almond bark

3 tablespoons hot cocoa mix

¾ cup mini marshmallows

sprinkles, crushed candy canes, chocolate chips (for filling)

3 cups hot milk for serving

Instructions

  1. Melt the chocolate in the microwave, or use a double boiler. 
  2. Add one tablespoon of the melted chocolate to each silicone sphere. Use the back of a spoon to spread the chocolate evenly in each mold, or use a small brush to paint the chocolate in the mold. Another method is to take the silicone mold with the melted chocolate and rotate it around until each sphere is evenly coated. Then place the mold upside down on parchment to let the excess chocolate run out. 
  3. Place the chocolate filled molds in the refrigerator for 5 minutes.
  4. Repeat the process with one more layer of melted chocolate. Place in the refrigerator for an additional 5 to 10 minutes. 
  5. Carefully remove each sphere from the silicone mold.
  6. Heat a small teflon coated pan over medium heat for a couple minutes. Take the pan off the heat. Place each sphere on the surface of the warmed pan for a few seconds to smooth out the edges. This will help when you seal up your bombs.
  7. Using a measuring cup, place one chocolate sphere on top to hold it in place as you fill it. Add 1 tablespoon of hot chocolate mix in the sphere. Then add about ¼ cup of mini marshmallows. You can also add crushed candy canes, or sprinkles. Just keep the edges clear so you can seal up your bomb.
  8. To seal the hot chocolate bomb heat the small frying pan again, just enough to warm it. Place the chocolate sphere in the pan for a few seconds and then carefully place it on top of the filled sphere. Gently press down to seal the edges. Put the completed bomb on the backside of a muffin pan to let it set up. Muffin pans turned over are great holders for hot chocolate bombs.
  9. Decorate with drizzled chocolate and sprinkles.
  10. Heat 1 cup of milk just until hot, not boiling. Place one bomb in a large mug. Pour hot milk over the top of your hot chocolate bomb and watch it open up with marshmallows. Stir and enjoy!

dsc00679

Storage of Hot Chocolate Bombs

Keep your bombs in an airtight container at room temperature. They last for several weeks.

Use Gloves

To keep fingerprints off your chocolate use latex gloves when handling your chocolate bombs.

Tips on Chocolate

Baking chocolate bars, and chips can be used. These will need to be tempered.

The easiest chocolate to use is compound chocolate (almond bark, chocolate candy melts). You just melt the compound chocolate in the microwave, or in a double boiler and it’s ready. No tempering. 

How to Temper Chocolate

Microwave the chocolate for 30 seconds at a time, stirring in between. Do this several times. It should be mostly melted, but there will still be pieces that are unmelted. Take it out of the microwave and stir until smooth and melted. To test if your chocolate is tempered pour a small amount of chocolate on a piece of parchment and place in the refrigerator for 5 minutes. If it’s shiny and breaks in half easily, it’s tempered. If it’s soft or dull it’s not tempered. To fix this, add a bit more chocolate and stir until it’s melted, or re-heat for a few seconds in the microwave until melted and smooth.

How to Use a Double Boiler

Place a small heatproof bowl filled with chocolate over a simmering pot of water. The bowl should not touch the water, but fit over the opening of the pot. The steam will melt the chocolate beautifully. Stir as the chocolate begins to melt until smooth. 

I hope you make these fun, yummy hot chocolate bombs. 

Merry Christmas!

Christmas, Food

Russian Tea Cakes

dsc00677

When I was a kid my mom called these delightful little cookies snowballs. It’s a cute name that perfectly describes these bite sized treats. Years later I was given this recipe for Russian tea cakes, and I’ve been making them ever since.

These are a favorite of my family at Christmas time. With a few simple ingredients you’ve got a wonderful buttery, crunchy cookie. They look so festive, like snow. A perfect holiday goody.

Walnuts add a delectable crunch. I highly recommend toasting the walnuts. This will add another depth of flavor to the tea cakes. Savory nuts and sweet powdered sugar come together perfectly in Russian tea cakes. These marvelous cookies will make a lovely addition to your holiday desserts.

Happy Eating!

For there is born to you this day in the city of David a Savior, who is Christ the Lord. Luke 2:11 


dsc00665

Russian Tea Cakes


Ingredients

1 cup softened butter

½ cup powdered sugar

1 teaspoon vanilla

2 ¼ cups flour

¼ teaspoon salt

¾ cupped chopped walnuts

2 cups of powdered sugar for rolling the cookies


To Toast Nuts

  1. Preheat oven to 350°
  2. Spread nuts on a baking sheet and toast in the oven for 8 to 10 minutes. 
  3. Toast until browned. Keep a close eye on them as nuts can burn easily.


Instructions 

  1. Preheat oven to 400°
  2. Line baking sheets with parchment, or leave them ungreased.
  3. In a medium sized mixing bowl use a hand mixer to cream butter, powdered sugar, and vanilla thoroughly.
  4. Add the flour and salt. Mix until combined.
  5. Stir in the chopped walnuts.
  6. Cover and chill the dough for 20 minutes, or up to overnight.
  7. Roll the dough into 1 inch balls and place on a baking sheet.
  8. Bake for 8 to 10 minutes or until golden brown.
  9. In a small bowl place the 2 cups of powdered sugar.
  10. While still warm, roll the cookies in powdered sugar.
  11. Cool the cookies, and roll one more time in the powdered sugar.

dsc00661

dsc00663

Notes

  • Pecans, and almonds can be used. 
  • Russian tea cakes can be kept in the freezer for up to 2 months.
  • Coat with powdered sugar before serving.

dsc00666

dsc00671

Christmas

Christmas Heirlooms

img_3818

The beautiful glass ornaments were my husband’s grandparents. They are a treasure that we will pass on to our sons. I call this one the satellite because that’s what it looks like to me. It’s one of my favorites, and I always put it at the top of the tree.

img_3819

I call this one the lemon because of the shape and it’s pale yellow center. It’s exciting each year as I open up the boxes of ornaments and pull out all these incredible heirlooms. Each piece of painted glass is a bit of family history. They remind us that generations before us celebrated the birth of Jesus and we will do the same.

img_3827

As we carefully unwrap these tiny gifts and place them on our tree we see family. We see love. We see God’s love. His love came down from heaven as a tiny baby to save us. Jesus is the greatest gift to the world, and He is worthy of celebrating. 

Beyond antique ornaments, I hope we have passed on to our children the importance of celebrating Christmas. We purposely made this time of year as positive as we possibly could for our kids. Making those memories with baking cookies to give out to friends and family. Or spending time with family, or counting down to December 25th with Advent calendars. Just our own little traditions to show the importance of taking the time to be joyful about Jesus Christ being born.

We celebrate that hope came into the world and changed everything forever. In all the negativity, and trying to take Christ out of Christmas, we choose Jesus. We will tell others about His amazing grace and perfect love. We will bake the cookies, and watch the silly movies, and sing along to all the Christmas songs. Because we have so much to be grateful for.

I pray that our family’s most prized Christmas heirloom is Jesus Christ. Our family story will continue with the next generation. As they open up the hand painted glass ornaments the love will be passed on. Jesus is the reason for this special season. 

For unto you is born this day in the city of David a Savior, who is Christ the Lord. Luke 2:11 


Merry Christmas!

Love you all,

Meghan 

img_3829

Christmas, Jesus

The Light of the World

pexels-photo-286145

It was a clear, cold December night as Martin Luther was walking in the woods preparing a sermon. As the forest darkened Martin headed back home and noticed light through the fir trees. Stars illuminated the night sky. That beautiful starlight made Martin think of Jesus coming down from heaven to earth.

He was so moved by his experience in the woods that Martin brought a small fir tree home and placed candles on the branches. The lit tree in his house was a reminder of God’s light to the world. This was an unusual thing to do in 16th century Germany. Over time, others began to follow Martin’s example and decorate small fir trees with candles. 

The story of Martin Luther, the infamous protestant reformer, lighting a tree is well known. Though it may be just a story, it still inspires. I can’t help but think about God’s light piercing the darkness as I imagine Martin looking through the trees to the starry sky. I love nature and it speaks so loudly and clearly to me that God made it all, and He holds it all together. 

The lights on my Christmas tree aren’t just a pretty decoration. Each time I look at the tree in my living room all lit up, I see Jesus. He is the light of the world. Jesus came from heaven to earth as a tiny baby to save us from our sin.

Then Jesus again spoke to them, saying, “I am the Light of the world; he who follows Me will not walk in the darkness, but will have the Light of life.” 

John 8:12, NASB 

Light came into this dark world to save us. Without Jesus there is darkness, spiritual darkness. It can be a bright sunny day, yet totally dark without knowing Jesus as Savior. His beautiful light lives in those of us who have said yes to Him. It doesn’t matter how gray the skies are, or how dark the world is, Jesus’ light lives in His followers because He is the light. That’s a miracle.

“If a man could travel so fast as always to follow the sun, of course he would always be in the light. If the day should ever come when the speed of the railway shall be equal to the speed of the world’s motion, then a man may so live as to never lose the light. Now he that follows Christ shall never walk in darkness.” 

-Charles Spurgeon 

Every time you see a Christmas tree strung with beautiful lights may it be a reminder of God’s light. God’s only son, Jesus, is the light of the world. His glorious light lives in each of us who have received Him as Savior through faith. Do you know Jesus as your Savior? His light can live in you too if you trust in Him today. 

Merry Christmas!

Love and blessings to all of you,

Meghan 

If you need prayer just drop me an email. Go to my contact page for info. 

Christmas, Food

Gingerbread Cookies

dsc00174

You can’t help but smile when you see a gingerbread cookie smiling back at you. I have been baking all kinds of cookies for years, but I never made gingerbread cookies until now. My youngest son loves gingerbread so this was the year to make them. I’m so glad I did. 

These gingerbread cookies are chewy, slightly crisp on the outside, with a nice soft interior. I do not like super soft cookies. I like my cookies on the crisp side. This gingerbread cookie is a good combo of both. The spice is not overwhelming, and there is just enough to know you are eating gingerbread. 

Any child would have fun making these little people, and decorating them. I used a very simple royal icing, but you could just as easily use buttercream icing. Even big kids will enjoy decorating these cookies. Everyone will love this sweet spicy gingerbread cookie. They are really good. It’s a nice addition to your Christmas baking. You’ll be smiling too.

Merry Christmas!

Gingerbread Cookies 

Ingredients 

¾ cup butter softened

1 cup brown sugar

¾ cup molasses

1 egg

2 teaspoons ginger

2 teaspoons cinnamon

½ teaspoon cloves

¼ teaspoon salt

3 ¾ cup all purpose flour

Instructions 

  1. Preheat oven to 350° 
  2. Line baking sheets with parchment or just leave them ungreased.
  3. Cream the butter and brown sugar in a large mixing bowl, or stand mixer, using the paddle attachment until it’s creamy and fluffy.
  4. Add the molasses and the egg. Mix on medium speed until combined.
  5. In a separate bowl add ginger, cinnamon, cloves, salt, and flour. Mix with a whisk.
  6. Gradually add the four mixture to the wet dough. It will be thick and sticky. Mix until combined.
  7. Divide the dough in half, and wrap in plastic. Flatten the dough into disks. Refrigerate the dough for at least one hour, up to overnight. 
  8. Roll out prepared dough on a lightly floured surface to approximately ¼ inch thick. It can be crumbly. Press firmly with the rolling pin but not hard. Cut out shapes with your favorite cookie cutters. Be careful as you transfer to your baking sheet. The dough can crumble easily. 
  9. Bake for 8 to 10 minutes depending on the size of your cookies. Larger cut outs will take about 10 minutes, smaller sizes will take about 8 minutes. Shorter bake time means softer cookies. Longer bake time means crispier cookies. They should be slightly brown and a little firm. 
  10. Leave the cookies for 5 minutes on the baking sheet before removing them to a cooling rack. They will continue to bake as they sit. 
  11.  Once the gingerbread cookies are completely cool, decorate with royal icing and sprinkles. 
  12. Store in an airtight container for up to 7 days. 

Notes:

  • Spray your measuring cups with cooking spray beforehand and the molasses will come out much easier.
  • It’s OK if your dough is crumbly. Just push it together when you roll it out. It will still bake nicely.
  • Adjust the spices and add more or less to your liking.
  • This recipe makes approximately 30 medium size cookies.

dsc00168

dsc00169

Royal Icing 

Ingredients

6 tablespoons (3 oz.) pasteurized egg whites

2 teaspoons pure vanilla extract 

4 cups powdered sugar

In a large bowl, or stand mixer, add egg whites and vanilla. Mix using whisk attachment for about 30 seconds until it’s frothy. Add powdered sugar and mix on low until combined. Switch to high and mix until the icing is glossy and stiff peaks have formed. This will only take a few minutes. Add any food coloring and place icing in a pastry bag to decorate cookies. Store in an airtight container in the refrigerator for up to 3 days.

Tips:

  • Add water if your royal icing is too thick.
  • Add powdered sugar if royal icing is too thin.
  • Let the icing sit out at room temperature for a bit after it’s been refrigerated.
  • Royal icing should completely dry in about 2 hours.
  • You need to work pretty quick when using this icing because it starts to harden up right away. 
  • Add a different flavor like peppermint or almond.

dsc00180

dsc00181

dsc00177